Java Jersey Hello World with Jersey 2.26
I was creating new projects with Jersey and noticed my template is broken with the last 2.26 version. Api was changed and you might need to add new stuff to the your project. Again as the previous one I will setup a new template for myself and in the meantime go through step by step for this post.
My setup is openjdk version “1.8.0_162” on Manjaro Linux and Intellij Ultimate 2017.3.
First start with new maven project and create your pom. It will have nothing specific at start and we will and jersey dependencies in a second.
<?xml version="1.0" encoding="UTF-8"?>
<project xmlns="http://maven.apache.org/POM/4.0.0"
xmlns:xsi="http://www.w3.org/2001/XMLSchema-instance"
xsi:schemaLocation="http://maven.apache.org/POM/4.0.0 http://maven.apache.org/xsd/maven-4.0.0.xsd">
<modelVersion>4.0.0</modelVersion>
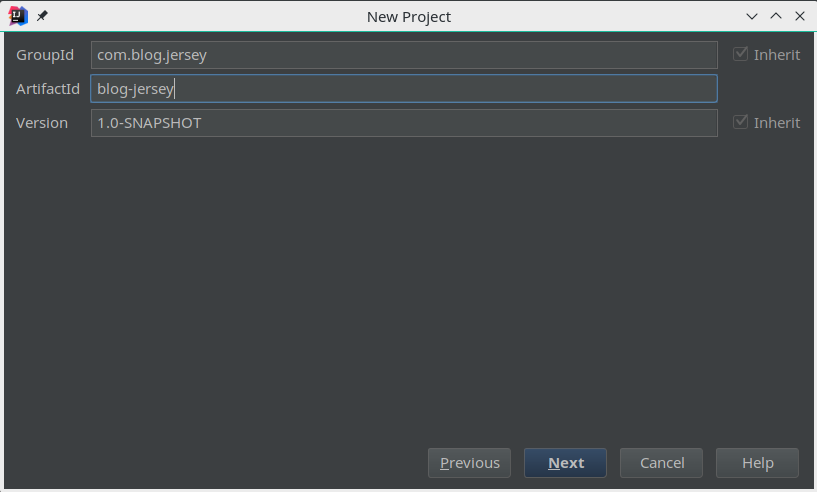
<groupId>com.blog.jersey</groupId>
<artifactId>blog-jersey</artifactId>
<version>1.0-SNAPSHOT</version>
</project>Packaging will be war since we will be using Tomcat to run it and can be added as <packaging>war</packaging>. Also add a name for the project as <name>JerseyBlog</name>. Also it should better have a proper source encoding which can be added as properties.
<properties>
        <project.build.sourceEncoding>UTF-8</project.build.sourceEncoding>
        <jersey.version>2.26</jersey.version>
</properties>
The main difference is the dependencies we use for jersey. After version 2.26 you need to add common and hk2 to your project to have a minimum running Jersey app.
<dependencies>
    <dependency>
        <groupId>org.glassfish.jersey.core</groupId>
        <artifactId>jersey-common</artifactId>
        <version>${jersey.version}</version>
    </dependency>
    <dependency>
        <groupId>org.glassfish.jersey.inject</groupId>
        <artifactId>jersey-hk2</artifactId>
        <version>${jersey.version}</version>
    </dependency>
    <dependency>
        <groupId>org.glassfish.jersey.containers</groupId>
        <artifactId>jersey-container-servlet</artifactId>
        <version>${jersey.version}</version>
    </dependency>
    <dependency>
        <groupId>org.glassfish.jersey.media</groupId>
        <artifactId>jersey-media-json-jackson</artifactId>
        <version>${jersey.version}</version>
    </dependency>
</dependencies>
To build and compile the project we will be using Java 8 and maven war compiler as given below. There is nothing specific about that, it is the default settings when you add war support to your project.
<build>
    <finalName>JerseyBlog</finalName>
    <plugins>
        <plugin>
            <groupId>org.apache.maven.plugins</groupId>
            <artifactId>maven-war-plugin</artifactId>
            <version>2.6</version>
        </plugin>

        <plugin>
            <groupId>org.apache.maven.plugins</groupId>
            <artifactId>maven-compiler-plugin</artifactId>
            <version>3.5.1</version>
            <configuration>
                <source>1.8</source>
                <target>1.8</target>
            </configuration>
        </plugin>

    </plugins>
</build>
With the build script I have everything I need for my Jersey project and the final pom file should be something like this.
<?xml version="1.0" encoding="UTF-8"?>
<project xmlns="http://maven.apache.org/POM/4.0.0"
xmlns:xsi="http://www.w3.org/2001/XMLSchema-instance"
xsi:schemaLocation="http://maven.apache.org/POM/4.0.0 http://maven.apache.org/xsd/maven-4.0.0.xsd">
<modelVersion>4.0.0</modelVersion>
<groupId>com.blog.jersey</groupId>
<artifactId>blog-jersey</artifactId>
<version>1.0-SNAPSHOT</version>
<name>JerseyBlog</name>
<packaging>war</packaging>
<properties>
<project.build.sourceEncoding>UTF-8</project.build.sourceEncoding>
<jersey.version>2.26</jersey.version>
</properties>
<dependencies>
<dependency>
<groupId>org.glassfish.jersey.core</groupId>
<artifactId>jersey-common</artifactId>
<version>${jersey.version}</version>
</dependency>
<dependency>
<groupId>org.glassfish.jersey.inject</groupId>
<artifactId>jersey-hk2</artifactId>
<version>${jersey.version}</version>
</dependency>
<dependency>
<groupId>org.glassfish.jersey.containers</groupId>
<artifactId>jersey-container-servlet</artifactId>
<version>${jersey.version}</version>
</dependency>
<dependency>
<groupId>org.glassfish.jersey.media</groupId>
<artifactId>jersey-media-json-jackson</artifactId>
<version>${jersey.version}</version>
</dependency>
</dependencies>
<build>
<finalName>JerseyBlog</finalName>
<plugins>
<plugin>
<groupId>org.apache.maven.plugins</groupId>
<artifactId>maven-war-plugin</artifactId>
<version>2.6</version>
</plugin>
<plugin>
<groupId>org.apache.maven.plugins</groupId>
<artifactId>maven-compiler-plugin</artifactId>
<version>3.5.1</version>
<configuration>
<source>1.8</source>
<target>1.8</target>
</configuration>
</plugin>
</plugins>
</build>
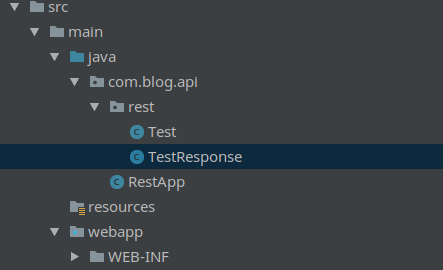
</project>Now lets move on our source code and start with web.xml file. Since this is a web project it will require to have to web.xml under the folder webapp. When you try to run it without web.xml it will give the error it needs that file.
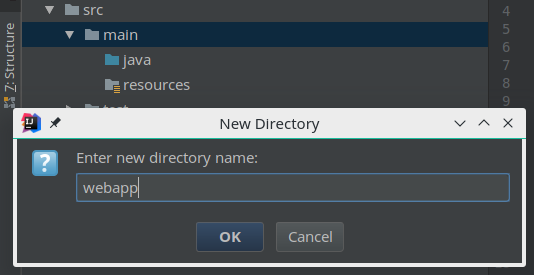
Create your webapp folder under main along with the java and resources folder. And inside that webapp folder create the WEB-INF folder where we will put the web.xml file. Your folders should look like this after these are created.

We can add web.xml file and it will empty for now just with the default web-app definition as given below.
<?xml version="1.0" encoding="UTF-8"?>

<web-app xmlns="http://xmlns.jcp.org/xml/ns/javaee"
         xmlns:xsi="http://www.w3.org/2001/XMLSchema-instance"
         xsi:schemaLocation="http://xmlns.jcp.org/xml/ns/javaee http://xmlns.jcp.org/xml/ns/javaee/web-app_3_1.xsd"
         version="3.1"
         id="blog-api">
</web-app>
Finally all the project structure we have to setup is done. It is time to move on Java files and implementing the rest api. If you are not familiar with Jersey it has an Application class where you can initialize your application and have all your settings etc in it. We will use ResourceConfig which extends this Application class and implement ServerConfig methods which enables you to set all server settings easily in one place with ease. These are both in Jersey API and we are not implementing or
importing something from other sources. Let’s create our app which will be under com.blog.api for me as RestApp.java.
@ApplicationPath("")
public class RestApp extends ResourceConfig {
    public RestApp(){
        packages("com.blog.api.rest");
    }
}
Here we have a RestApp class which extends ResourceConfig with @ApplicationPath("") annotation. It is obvious that the path you give here will be your top path on the url as host:/api/.... To utilize the imported settings from the ResourceConfig we just need the default constructor and can access all these directly which I will not go into details. But as expected packages("com.blog.api.rest") will scan the "com.blog.api.rest" folder for the resources and if have any deploy them automatically.
Let’s add a resource that returns a JSON response from an object automatically as in the package above. This will be done with jackson as you can see in your pom file, we added it as a dependency.
@Path("")
public class Test {
@GET
@Produces(MediaType.APPLICATION_JSON)
@Path("/test")
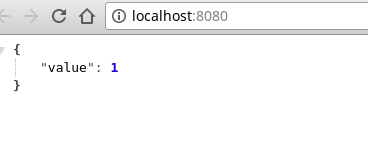
public TestResponse getTest(){
return new TestResponse(1);
}
}public class TestResponse {
public int value;
public TestResponse(int value){
this.value = value;
}
}When you add @Path("") annotation to the class it will be treated as a resource. However just adding the annotation will give you an error saying this class doesn't have any jax-rs implementation. To have that we will add the getTest() method which doesn’t take any parameters and returns TestResponse. HTTP methods are defined as annotations @GET, @POST, @DELETE etc. The path you defined will be a subpath on the class, meaning if you have @Path("users") on class and @Path("teams") on the method then you will be accessing it to as users/teams/. @Produces() defines the return type and you can have multiple return types by just adding it to annotation.

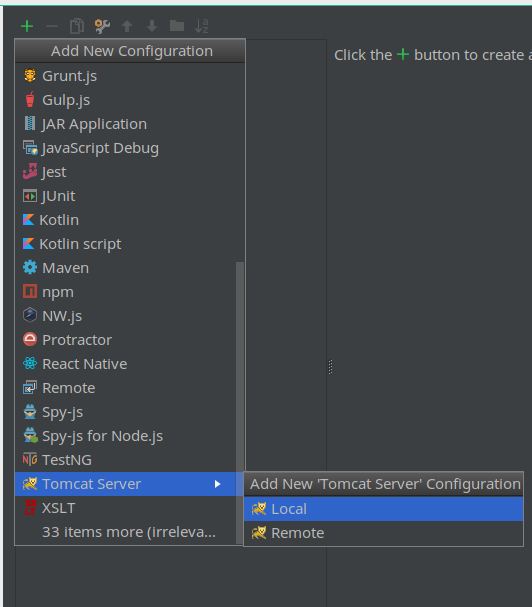
That will be all we need to build the project but also I want to run it on Intellij. However it has no default run setting and I will be adding it manually. In order, first click on the Edit Configurations, Add (+ sign), Select Tomcat-> local.
You will notice it says there is an error with the project as we didn’t specify what we are deploying. Now click on Fix button and select :exploded options for the war and it should be good to go.
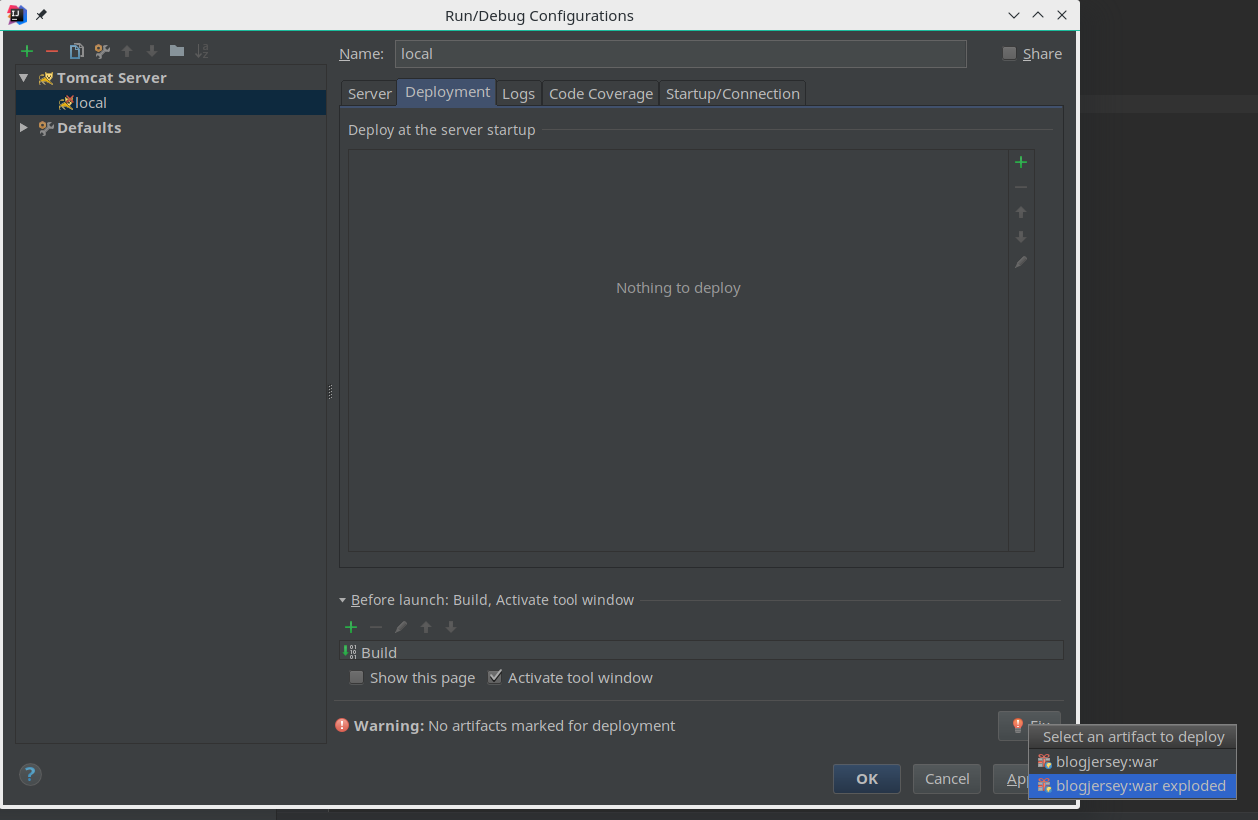
Save the setting as it is and click on Run which should bring you the first service you implemented with Jersey.